I have had the opportunity, recently, to work for Aleta Schnitzer at Adorn Cakes by Aleta. I have known Aleta for years, so when she needed help in her shop, I jumped at the chance to work with and learn from her!
All of the cakes were collaborative, but occasionally, she let me work on my own for part or all of the project. The designs were all hers, or from inspiration pictures.
I had used Italian meringue butter cream in the past, but Aleta uses it exclusively, and she converted me quickly. All of these cakes are made using IMBC.
This post shows some of the cakes I worked on and learned from with Aleta.
Everly
I believe this cake was for a first birthday. It was my first attempt at modeling an object, the lamb. I worked on it entirely on my own, with Aleta's coaching and ideas. The lamb is made entirely of modeling chocolate, with each puff of "wool" hand rolled and attached by royal icing.
This cake was picked up by the customer, so we removed the lamb, and put her in a separate box for transport. Apparently, when they got it home, they set the lamb on a table or counter, and the dog got to her. :( Aleta scrambled, and made another one last minute.
I assembled the cake, and added the rosettes, and Aleta piped the flowers around the name.
Smash Cake
This picture is from the photographer's Instagram feed. I LOVE how a good photographer can really make a cake look good!
This was my first ombre effect cake. We wanted to keep that striped look, rather than blending, however, and it worked really well! I also made the "1" out of modeling chocolate.
Race Car
This was such a fun cake! Obviously, it was for a 2nd birthday. I did all of the modeling of the cones and race car out of modeling chocolate, and all of the other decorations are modeling chocolate as well. Bottom tier "tire" is modeling chocolate, and I helped make the pattern on the side, but Aleta did most of the work on that tier, as we were kind of making it up as we went.
The cake board is covered with fondant that we rolled a galvanized pattern into, and painted silver with a mixture of luster dust and confectioner's glaze.
Rosette Wedding
This cake marked my first attempt at edible lace, and I have to say, it was easier than I expected, but also not as hard as I was bracing myself for. The "lace"material was spread into the mold, and then baked on a very low temperature until set; maybe 20 mins or so. I then painted it with the same luster dust mixture as on the race car cake board.
I love the texture of the rosettes! I think it creates some movement that really enhances the overall feel of the cake. It's hard to see in this picture, but there is a pearl border along the bottom of the top tier. It was made out of modeling chocolate in a silicone mold, and given a pearl sheen. This was one of the first cakes Aleta let me go it alone on.
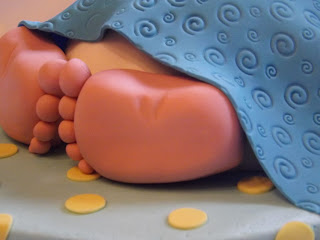
It's a Boy!
This cake idea came from an inspiration picture submitted to Aleta by the customer. It was for the baby shower of one of her former bridal clients.
Aleta gave me the lead on this cake, and I did it myself! The white areas are the IMBC showing, everything else is covered in or made of modeling chocolate.
I think it was so sweet and so fun!
Modern Wedding
I can't take much credit for this cake, but I did contribute to it.
I built the pyramids out of gum paste. It took several versions before we got some that looked the way Aleta wanted. Sometimes, the fun of decorating comes from trial and error; just playing around until you get it right!
I also frosted the top tier in ombre. I believe the rest of the cake was done by Aleta, and possibly Kaitlin, another fabulous assistant.
Indian Wedding
This cake seemed a little weird to me when Aleta first showed me the sketch; but it grew on me as I went along, and I was really happy with the result! This is another one where she let me go on my own.
The bride was from India, and was doing a traditional Indian wedding, with an art deco flair. Very beautiful!
I extruded all of the swags from gum paste, then shaped them and put them in the freezer for a bit, so they would hold their shape, then placed them on the cake. It was trickier than it seems, but the result was wonderful.
Gold Drizzles
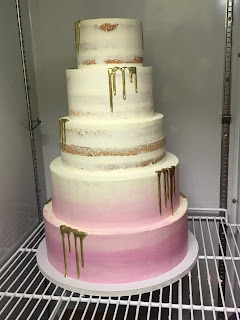
Here's proof that a good photographer makes all the difference! The top picture was taken with my phone, while the cake was still in the fridge, awaiting delivery. The second picture is the completed cake at the venue, taken by the wedding photographer.
I had never done drizzles before this cake, and they were as easy as they look! The really fun part, however, was painting them gold, for a really fancy look.
I also learned to do semi-naked cakes with Aleta. The semi naked look is growing on me, but I prefer when the bottom tier or two are completely frosted, so that the cake doesn't have too rustic of a look.
ONE
I wish I had a better picture of this cake, because it turned out so cute! It is another cake from an inspiration picture. I frosted the cake, and extruded the string, and applied it to the cake; however, I had help on this one from Kaitlin, and Connie to get the polka dots applied, and the balloon done quickly.
Woodland Fun
For this cake, I was only involved in making the teepee and woodland creatures. I also did not paint the teepee, just assembled it. The teepee is gum paste, and the woodland creatures are modeling chocolate. I printed the pictures on the computer, and used that as a template to cut the features in the faces and bodies.
The birch look on the sides of the cake, and assembly was done by someone else.
Hammered Copper
When we were working on this one, I didn't have a complete idea in my head of Aleta's vision, so I just did each element as I was told, but the finished product is one of my favorites!
I made one of the "hammered copper" inserts, cut out, shaped, and applied most of the leaves, with help. (It's a big task, even if it's not so difficult)
I also helped marble the modeling chocolate around the middle tier, but I don't think I was the one to apply it.
New Techniques
I am lumping these two cakes together, because they show two new finishing techniques I learned with Aleta.
The top cake, we call the "Dolce swirl." It is very simple, but takes a little feel to get it to look even.
The bottom cake is literally spackled with butter cream. The IMBC makes this so easy, because you frost and set up the cake in the fridge, and then you have a hard surface to spackle on.
I enjoyed so much working for Aleta. I learned as much in that time as I had previously learned in my life!
During my time there, I also used an airbrush for the first time, and tried many other things for the first time.
It's all about learning and growing, and I am looking forward to opportunities to continue practicing these techniques!


